29.12.13

Prime rib

ingredients
prime rib roast, preferably grass-fed and aged, 4-6 pounds
coarse sea salt, generous quantities
black pepper, freshly ground
garlic, crushed and finely chopped, half a head
beef stock, 3/4-1 1/2 cups (enough for at least an inch of liquid in the roasting pan)

dry red wine, 3/4-1 1/2 cups (optional, enough for at least an inch of liquid in the roasting pan when added to beef stock)
dried onion soup mix, one packet (optional)

directions
1. preheat oven to 500˚ F.
2. rub roast with a generous layer of sea salt, black pepper and garlic and place in roasting pan.
3. cook at 500˚F for 30 minutes, then lower temperature to 325˚F.
4. pour beef stock, red wine (if using) and onion soup mix into roasting pan.
5. insert meat thermometer. continue cooking until thermometer reads 137˚F.
6. remove roast from oven and allow to rest for 15-20 minutes.
7. pour drippings from pan into a saucière and season with salt and pepper to serve alongside beef.
8. slice and serve with au jus, steamed or roasted vegetables and popovers or Yorkshire pudding.

the story
This is a fairly simple approach to a classic prime rib and, with the right meat, yields the best prime rib I've had so far.

When I was a little girl, my parents had season tickets to our local symphony and to performances from visiting artists. Across the street from the historic Stanley Theatre was the Fort Schuyler Club, an even older private club where we ate dinner before our show (and where I loved trying to peek into one of the beautiful, seeming-off-limits upstairs room, with their mysterious dark wood paneling and lingering cigar smoke). The building reminded me, in a way, of the mansion in the movie Clue; I was sure there were secret passages somewhere. The pre-theatre menu always involved prime rib (sliced to order) and an ice cream sundae bar. Eight year old girls were free to approach the buffet in any order desired (which sometimes meant prime rib, followed by ice cream and hot fudge, followed by a dénouement of prime rib, and other times meant an ice cream appetizer, prime rib, and a second dish of ice cream).

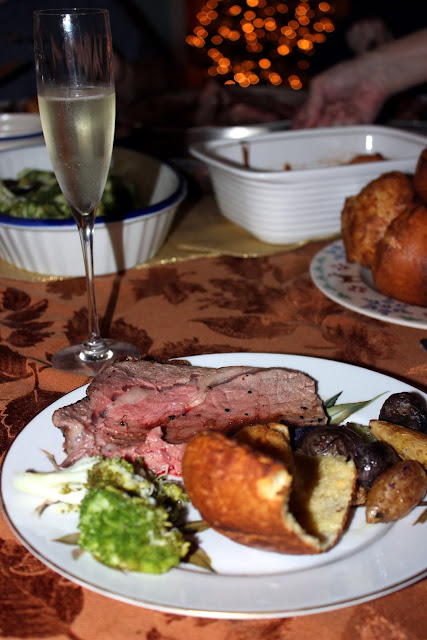
Celebrating the night before Christmas Eve with prosecco (my new favorite is Andreola), prime rib, 
roasted purple and white potatoes, popovers, and steamed broccoli. December 2013.

28.12.13

Pizzette two ways

ingredients
dough
all-purpose flour, 5 cups
yeast, 1 package
water (warm), 1/3 cup
sugar, 1 teaspoon
water (room temperature), 2 cups
salt, 2 teaspoons
olive oil, 2 tablespoons

topping for pizzetta margherita (enough for 3 pizzette)

mozzarella di bufala, fresh, sliced, 12 ounces
cherry or grape tomatoes, chopped in halves or quarters, 1.5 cups
balsamic vinegar or Worcestershire sauce, 1 tablespoon (optional)
garlic, crushed and finely chopped, 3-4 cloves
fresh basil, torn or coarsely chopped, 1/2 cup
olive oil, 6 tablespoons
coarse sea salt, to taste
black pepper, freshly ground, to taste

topping for pizzetta with caramelized onions, mushroom and prosciutto (enough for 3 pizzette)

Vidalia onion, thinly sliced with a mandoline
mushrooms, wild or shiitake and baby bella, coarsely chopped, 1.5 cups
balsamic vinegar, 2 tablespoons
prosciutto, thinly sliced, about 4 ounces
olive oil, 1/2 cup plus 4 tablespoons
butter, 1 tablespoon
raw sugar, 2 tablespoons
baby arugula, 3 cups
lemon juice, 1/2 cup
coarse sea salt, to taste
black pepper, freshly ground, to taste
maple pepper, 1 teaspoon (optional)
mozzarella, shredded, 8 ounces
fontina, shredded, 8 ounces
asiago fresco, shredded (optional)

makes
6 individual pizzette

directions
dough
1. Dissolve yeast in warm water with sugar.
2. Mix all ingredients (including yeast) with a wooden spoon.
3. Knead dough into a soft, tacky ball (adding more room-temperature water or flour if needed).
4. Allow to rise for 1-2 hours (but up to 3-4 hours is okay). Dough should double in size.
5. Start preparing toppings (those below or others of your choice) while the dough is rising.
6. Preheat oven to 425˚F. Heat a pizza stone or line cookie sheets with parchment paper.
7. Flour the stone or parchment.
8. Divide dough into six balls.
9. Roll and stretch each into an oval shape.
10. Spread each pizzetta with one tablespoon of olive oil (more or less as needed to completely cover with a very thin layer). Use a spoon.

margherita
10. Soften garlic in three tablespoons of olive oil. Allow to cool.
11. Season 1/2 inch slices of fresh mozzarella and chopped tomatoes with sea salt and pepper.
12. Marinate mozzarella and tomatoes with basil in olive oil and balsamic vinegar or Worcestershire sauce (if desired) for 15-20 minutes.
13. Arrange slices of mozzarella, tomatoes and basil over top of three pizzette.
14. Bake at 425˚F for about 20 minutes, until crust is crisp and cheese melted.

caramelized onions, mushrooms and prosciutto

15. Heat one tablespoon of olive oil and one tablespoon of butter over medium-high heat in a sauté pan.
16. Add thinly sliced onions and stir until soft and translucent.
17. Add sugar and continue to stir until sugar is melted and gently caramelized. Set aside.
18. In the same pan, sauté mushrooms and balsamic vinegar (with an additional tablespoon of olive oil if needed) over medium heat until soft. Add to bowl with onions.
19. Wipe pan with a clean cloth. Crisp prosciutto over high heat.
20. Allow crispy prosciutto to cool and then crumble. Set aside.
21. Spread mushrooms and onions over three pizzette. Top with shredded mozzarella and fontina, as much as desired.
22. Bake pizzette at 425˚F for about 20 minutes, until crust is crisp and cheese melted.
23. Immediately top with crumbled prosciutto.
24. While pizzette is cooling to serving temperature, whisk lemon juice, olive oil, and maple pepper (if available).
25. Toss arugula with dressing and season with coarse sea salt and freshly ground pepper as desired.
26. Top pizzette with fresh arugula; alternatively, cut pizzetta into slices and place a bowl of arugula on the table with small tongs to top each piece individually (this is a good option if some people are skeptical of fresh greens on their pizza, or if you have made enough for leftovers, since the pizzette freeze well without the arugula).

the story
What's up with this
sticky stretchy stuff?
I love pizza, especially homemade pizza. It's very possible to make pizza into a relatively healthy dinner when you are in control of all the ingredients. Topping with fresh arugula has been one of my favorite ways to go since my mom starting doing it a few years ago; this particular incarnation was conjured up last night when I was desperate from an alternative to the margherita variations that I'd already had twice in the past few weeks. The margherita version here is my own; I like to marinate my tomatoes in balsamic before using them in pizza and fresh tomato sauces. The Worcestershire sauce alternative was suggested by my friend Lauren when we were in medical school several years ago.


Family make-your-own pizzette night.
January 2014. 


25.12.13

A Christmas Eve menu

aperitivi
Hot buttered apple cider with Calvados
Arancini with marinara sauce
Sausage roll
Orange, fennel, arugula and pomegranate salad. Christmas Eve 2009.
Swiss, onion and bacon tartlets
Baked Brie with pecans
Lupini beans

antipasti
Shrimp cocktail
Orange, fennel, arugula and pomegranate salad 

primi
Angel hair aglio e olio
Shrimp scampi over angel hair pasta

secundi
Chicken romano with greens and artichoke hearts
Beef stuffed with mozzarella with mashed potatoes, sautéed peppers and mushrooms
Eggplant parmigiana
Christmas Eve 2013: not quite organized 
and missing a few suspects.

contorni
Roasted eggplant, grape tomatoes and bell peppers (vegan)
Grape tomatoes, mozzarella and bread

dolci
Chocolate crinkles
Petit-fours
Peanut butter cups
Almond-paste cookies
Sugar cookie snowflakes
Zeppole
Christmas ribbons
Fig cookies
Chocolate fruit and nut bark

caffè
Coffee, tea and cappuccino

digestivo
Port wine

bevande
Red and white wine
Beer and hard cider
Sparkling water and soda
Water with orange, lemon and raspberries

Clockwise from foil-wrapped dish: Petit-fours, starlight cookies, chocolate crinkles, anise cookies,
sugar snowflakes, chocolate bark, and fig cookies. Christmas Eve 2013.


We proudly present...ghosts of Christmas past...


Christmas Eve 1996. The hair, the velvet overalls, the generalized awesomeness.
Fun fact #1: I am wearing my first-ever "little black dress." 
To a family Christmas Eve celebration. Because I am 15. And awesome.
Christmas Eve 1998. Being a first-year in college apparently means it's okay 
to wear what is essentially an undergarment in public. Overdressed to underdressed...
Fun fact #2: We are now so tall that the photographer (our cousin)
can't figure out how to fit our heads in.


Christmas Eve 2003. Problem solved: tall people in front!
Fun fact #3: Sometimes the posing goes on long enough 
that it's good to keep that drink handy.
Christmas Eve 2005. One of my better years,
but I still wish I'd had a tartan skirt too.

Fun fact #4: For those keeping scores, we are up two from the 1996 picture.

Christmas Eve 2008. Still with that drink handy...
Fun fact #5: 2009 is the only year in the past twenty that I was not present to pose for these photos.
Christmas Eve 2012. Up six with one missing here. 
Fun fact #6: There are actually three generations represented in this picture.
Fun fact #6.5: The girl holding my son is the baby I was holding in 2003.


23.12.13

Anise cookies | Soft Italian cookies

ingredients
dough
butter, 1/2 cup
sugar, 1/2 cup
eggs, large, 3
anise extract, 2-2 1/2 teaspoons (I really like anise)
all-purpose flour, 2 1/2 cups
baking powder, 1 tablespoon
whole milk, 2-3 tablespoons

icing
confectionary sugar, a lot (okay, about 2 cups)
single cream or half-and-half, some
anise extract, 1/4 teaspoon or to taste
gel food coloring, preferably red

directions
1. Preheat oven to 350 degrees. Line cookie sheets with parchment paper.
2. For cookies, cream the butter and sugar until light and fluffy, about 5 minutes. 
3. Add eggs, one at a time, mixing after each addition. 
4. Add anise extract.
5. Blend flour and baking powder. 
6. Start by adding one-third of the dry ingredients to the butter/sugar in your mixer, then add one tablespoon of milk. 
7. Add another third of the flour and another tablespoon of milk. 
8. Finally, mix in enough of the remaining flour until your dough is slightly thicker than brownie batter (it should be softer than a drop cookie dough).
9.  With floured hands, scoop about a tablespoon of dough and roll into a ball. Place on parchment-lined cookie sheets, about two inches apart. (If you can easily roll them without extra flour, they are probably too dry. You can mostly remedy this by coating your hands with water instead.)
10.  Bake cookies 10-12 minutes (they won't be brown on top and slightly browned on bottom but the insides will be soft and cake-like).
11. For the icing, mix sugar, milk and anise extract to make a glaze. It often takes me several tries to get the right balance. It should be thin enough that it will spread to form a smooth layer but thick enough that it was coat the cookie top evenly (i.e. it won't all drip off and pool around the cookie). Here's another hint from one of my many relations: "When I make the icing, I make it thick but then I microwave it for 10 seconds so it is thin enough for dipping." I prefer to use white icing and decorate with red bonbon-style swirls, but you can also color your food coloring in accordance with the season (as my grandmother and great-aunt traditionally did). 
12. Hold cookie in your hand and turn upside down so you can dip the top half in the glaze; turn over and place back on parchment. 
13. If using sprinkles, immediately top with sprinkles so they will stick. Otherwise, allow icing to harden for approximately 30 minutes.
14. While icing is hardening, mix a smaller batch and add a teaspoon of red gel food coloring (must be gel to achieve a truly vivid color). Pour icing into a pastry bag with only a tiny nick (about 1-2 mm) in the top. 
15. Decorate with swirls (see picture above) or as you please.
16.  Freeze in a single layer for ~2 hours, then stack for easy storage, or place in an airtight container until ready to eat.

makes
40 cookies

the story
These cookies, ubiquitous at holiday gatherings and decorated seasonally, are my absolute favorite. Anise extract is basically the best thing in the world, and the amounts of anise extract should be adjusted to fit your tastes. (In their later years, occasionally, a relative would slip with the extract bottle...a little sinus-clearing but I still loved them). Naturally, they were the first cookie I let my son try, when he was about nine months old. 

The red swirl decoration came from my admiration for beautiful petit-fours in my favorite bakery when I was living in Copenhagen. The Christmas after I moved back to the States, I made boxes of cookies and sweets to send to my friends. I set four anise cookies in a tiny jewelry box, each with a different design: a red swirl, a blue star, a yellow cross, and a green dot. Only the red swirl stuck. 

Where did all my cookie go? December 2012.

22.12.13

Turtle bread

ingredients
flour, 5 cups
salt, 1 tablespoon
sugar, 1/4 cup
eggs, 2
milk, 1 cup
butter, 1/4 cup
dry yeast, 2 packages
water, 1/4 cup
sugar, 1 teaspoon

directions
1. Heat butter and milk until butter melts.
2. Allow to cool to room temp.
3. Mix flour, sugar, and salt in food processor until just blended.
4. Dissolve yeast in water and one teaspoon of sugar.
5. Add eggs, milk/butter mixture, and yeast to food processor.
6. Mix until ball of soft dough forms.
Christmas tree bread. December 2012.
7. Place ball in bowl.
8. Cover with plastic wrap and allow to rise for about 1 hr.
9. Shape into a turtle (1 large round ball for body, 4 small balls for legs, and 1 medium ball for head) or make many balls and arrange in the shape of a turkey or Christmas tree.
10. Allow to rise for another hour.
11. Brush with beaten egg.
12. Bake at 350˚F for 30 minutes or until browned,
13. Tap on bread. It’s done with it sounds hollow. 

the story
When my sister was in kindergarten, her class "made' Thanksgiving dinner (allegedly) Pilgrim-style. While thankfully no one set five year olds to work basting a turkey, someone did decide that they were well-suited to make butter from scratch, since this involved shaking a jar of cream and other ingredients for hours.

The punchline: the butter never solidified, though one little girl  was apparently happy to douse her mashed potatoes in extra cream. 

For years afterwards, every Thanksgiving, my sister baked turtle bread (from a recipe discovered in a children's cookbook - we think) and made, successfully, homemade butter. Several years ago, we realized that everyone preferred to eat the crustier head and feet of the turtle, and the idea to make the whole loaf out of rolls stuck together was born. Soon after, the turtle evolved into a turkey, which devolved into a tree. Still very tasty though.


The intrepid baker and butter-maker, age 10. Christmas 1993.
Sometime after this photo, the sheer number of ornaments was pared down considerably.

Greek cookies | Mezzelune grece

ingredients
butter, 1 cup
confectionary sugar, 2 cups
egg, one
anise extract, 2 tablesppons
almond extract, 1 1/2 teaspoons
flour, 5 cups

directions
1. Mix butter, sugar, egg, and extracts.
2. Add two cups of flour.
3. Blend for 1 1/2 minutes with an electric mixer on medium speed.
4. Stir in remaining flour (3 cups).
5. Knead until smooth.
6. Shape into crescents.
7. Bake at 350˚F for 15 to 20 minutes. (Cookies won’t brown on top.)
8. Sprinkle with confectionary sugar while hot.

the story
Random memories of Christmas decorating...


Christmastime with my grandmother Ida at her house, c. 1970s.
For most of my childhood, we had pretty silk, lace and velvet stockings that hung by the fireplace, strictly for decoration, and five or six stockings apiece (some of which look to have been purchased around the same time as the ones here) that would appear on Christmas morning, full to bursting and laid out on the sofa.


My sister next to our Christmas tree, c. 1987.


We usually had (and still have) a large (ten-plus foot) Christmas tree that we cut down ourselves. With white lights only (colored lights were deemed tacky), the tree's color scheme only changed a few times in twenty-five years. It started out red and white, then dusty blue and mauve, and finally, most recently shades of blue and white. The white snowflake ornaments were crocheted by my grandmother; I have a few that have survived on my own tree.


My sister (left) and I (right) on Christmas morning, c. 1988. 
Upstairs, usually between our bedrooms, we were allowed to have a smaller tree (this one was looking a little Charlie Brown-esque) with lights and ornaments in every color imaginable. Sometime in late elementary school or junior high, we each bought a small artificial tree for our rooms that we decorated with ornaments we have collected for ourselves. I favored white lights, lavender ribbons and lots of glass, crystal and sparkles; my sister stuck with the rainbow colors.


My first living Christmas tree! Colorado, December 2011.

14.12.13

Rustic bread, two ways

ingredients
bread flour, 3 cups
active dry yeast, 1 package (B-breadmaker) or 1 teaspoon (NB-no breadmaker)
water, none (B) or 1 1/3 cups (NB)
sugar, 3 tablespoons (B) or none (NB)
salt, 1 teaspoon
olive oil, 3 tablespoons (B) or 1 tablespoon (NB)
directions
1. add to breadmaker.
2. set crust to "light" and size to "2 pounds" and start.

oh, is that cheating? if you don't have a breadmaker, try this version, adapted from Jim Lahey's no-knead method...


1. mix all ingredients to form a sticky dough.

2. cover and let rise at room temperature for about 18 hours (overnight). the dough should more than double in size
3. scrape out of the bowl onto a floured surface and shape into a boule (round loaf). 
4. wrap the dough loosely in a floured tea towel or cloth napkin and let it rise for another 1-2 hours.
5. preheat the oven to 475˚F while the dough is rising. 
6. with 30 minutes left to rise, place a rack in the lower third and place a covered ~5-quart pot in the middle. 
7. remove the pot. flour the top of the dough again and invert it into the pot.
8. cover and bake for 30 minutes.
9. remove lid and back for another 15-30 minutes until nicely browned.
10. carefully lift out of pot and allow to cool for at least an hour before slicing.

the story

My mom and sister baking bread.
December 2013.


10.12.13

Soft gingersnaps

ingredients
all-purpose flour, 2 1/4 cups
ground ginger, 2-3 teaspoons*
baking soda, 1 1/2 teaspoons
ground cinnamon, 1/2-1 teaspoon*
nutmeg, freshly ground, 1/2-1 teaspoon*
salt, 1/2 teaspoon
black pepper, freshly ground, 1/4-1/2 teaspoon*
dark brown sugar, packed, 3/4 cup
unsalted butter, room temperature, 1 cup (2 sticks)
egg, one
blackstrap molasses, 1/2 cup
fresh ginger, finely grated, 2-3 teaspoons*
vanilla extract, 1 teaspoon
crystallized or candied ginger, finely chopped, 1/4-3/4 cup*
sanding sugar, 1 cup (don't skimp!)

directions
1. Preheat oven to 350° F (177° C) and line baking sheets with parchment paper.
2. Whisk first seven dry ingredients (all except sugar) in a medium bowl. 
*All spices in the recipe have a three-point range (e.g. use 2 1/2 teaspoons of ground ginger for average spiciness; 3 teaspoons for extra spice; 2 teaspoons for a milder cookie). 
3. Beat brown sugar and softened butter in a large bowl until light and fluffy. 
4. Slowly add egg, molasses, fresh ginger, vanilla and crystallized ginger until just blended. 
5. Slowly add flour mixture until blended.
6. Fill a shallow bowel with a generous quantity of sanding sugar. 
7. Scoop dough with a tablespoon. Using a second spoon, scoop into sugar and turn to coat well. (Coat it really, really well or it will stick to your hands.)
8. Roll into ball and drop onto baking sheets, spacing balls about 2 inches (5 cm) apart.
9. Bake cookies until edges are firm and centers appear cracked, about 12 minutes.

the story
During my first year of fellowship, I liked to bake something to thank my residents for their hard work at the end of each long (and invariably emotionally, physically and intellectually taxing) month. During my first month as the oncology fellow, the residents got strawberry cupcakes. My second month included Thanksgiving, so I made eight kinds of Christmas cookies, including these, adapted from Bon Appétit. The range for the spices came from my dad's impression that they were quite mild, while my mom felt they were plenty spicy. Use the top end of the range for a very spicy cookie; the middle for a typical gingersnap; and the low end for a mild cookie.

First cookie of the season. December 2013.
toddler rating
awesomely delicious, 'til the last bite, which he decided to give to the dog. which would not have been a big deal, except that he realized the dog liked the cookies, and then he wanted to share my cookie with the dog too.

The glass bell with blue and purple flowers has been one of my favorites since I was a little girl.

8.12.13

Simple fig jam

ingredients
fresh figs, quartered, 1/2 pound
maple syrup, medium-grade, 2 tablespoons
orange blossom honey, 1 tablespoon
bourbon vanilla bean paste, 1/2 teaspoon (optional)

directions
1. toss figs with syrup, honey and vanilla bean paste.
2. bring to a boil over medium-high heat.
3. quickly reduce to low heat.
4. simmer until fig meat separates easily from the skin and liquid is reduced, approximately 20-30 minutes.
5. blend well with an immersion blender (or in a food processor).
6. store in a sealed container in the refrigerator up to seven days.

the story
This easy jam is delicious on biscuits or as a complement to cheeses (especially grilled halloumi or soft goat cheeses - try Haystack Mountain Snowdrop). It's also a great filling for linzer cookies. I don't mess around with pectin; instead, the syrup and honey act to both sweeten and thicken the jam. The figs themselves produce a jam that thickens much faster than other fruit, despite the absence of pectin. I also don't mess around with canning - it's so delicious fresh - but you definitely could.

makes
8 ounces

Cousins sharing a first Christmas Eve. December 2012.
Christmas gifts, awaiting Christmas morning. December 2012.

5.12.13

Chocolate pusties | Pasticciotti cioccolati

ingredients
crust
Eggs, two
Lard, one-half pound
Light brown sugar, two cups
All-purpose flour, four cups
Baking powder, one teaspoon
Baking soda, one teaspoon
Cold water, one tablespoon

chocolate filling
Flour, one-half cup
Sugar, one cup
Milk, one cup
Water, one cup
Cocoa, one-quarter cup
Vanilla extract, one teaspoon
Almond extract, one-half teaspoon

directions
1. Mix filling ingredients and cook over a double broiler until thick like pudding. (You can use a glass bowl over a pot of boiling water as well.)
2. Add vanilla and almond to filling and cool.
3. Mix crust ingredients like pie crust. (That means:
- Mix dry ingredients well.
- Cut lard (or butter, if substituting) into dry ingredients.
- Beat eggs and water together.
- Work eggs and water into dry ingredients and butter, mixing as little as possible until it forms a ball.)
4. Roll out crust dough to about one-quarter inch.
5. Shape dough into pusty tart pans. (I suspect these are fairly difficult to find outside of upstate New York and a few areas in Italy - any fluted tartlet pan will work, although the scalloping will be narrower.)
6. Pour filling into crusts.
7. Shape top layer of crust over filling. (If you had individual tartlet pans - rather than a tartlet tray - you can use these to cut out the top.)
8. Bake at 400˚F for 15 to 18 minutes.

the story
One of the joys of transcribing my grandmother's cookbooks into digital form is the sheer minimalism of many of the recipes, as above in my great-aunt's direction to simply "mix crust ingredients like pie crust." (Because, who, making pusties, doesn't know how to make pie crust?) In addition to filling the pages of a composition book, many of the recipes were scribbled on the backs of old envelopes and receipts, or in the margins of newsprint. Many were not much more than grocery lists, missing quantities or directions - or both. For the most part, I've tried to keep the original language and just add additional clarifications.


Aunt Bea, c. 1940s: Before she died in 2011,
our family included five living generations;
she was my great-aunt but a great-great-great-aunt
to three of my youngest cousins.
Pasticciotti, abbreviated pusties (singular pusty), are a classic pastry of my hometown. In addition to my favorite, chocolate, they also classically come filled with vanilla pudding (recognizable by a dot of dough on the top), as well as a variety of more contemporary fillings (lemon, apple, pumpkin...so feel free to be creative). My mom thinks this recipe probably came to my great-aunt Bea through my great-grandmother Maria, who came to Utica from Caserta, near Naples, Italy, as a teenager. The addition of almond to the chocolate filling is supposed to indicate its authenticity. We generally eat them at all times of year and for all occasions, not just Christmas. My early attempts to trace the origins of pasticciotti led me to Salento, Salerno (about 100 miles from Caserta) and the Puglia regions of Italy, and to recipes for "Neapolitan ricotta pie" (a pusty-like creation with a sweet ricotta filling).

You can read more about pusties (and other treats) here at the Ridiculous Food Society of Upstate New York blog.


FYI: Pusties can be frozen and thawed in the oven or microwave, but I learned the hard way that the microwave can heat the filling so it expands more rapidly than the crust, leading to...pusty explosion.


My great-grandmother Maria Carcione Pietrantuono (back, center) with her five surviving children (one son and four daughters),
a son-in-law and daughter-in-law, and two grandchildren (eventually she would have nine), on their front porch in Utica, New York, c. 1944.
As of this post, Maria, who died in 1956, has 21 great-grandchildren, 17 great-great-grandchildren,
and three great-great-great-grandchildren (yes, that adds up to 50 cousins - plus spouses).
Fifth generation: My son, then 17 months old, with his nine year old (third) cousin, Emmi,
both great-great-grandchildren of my mother's grandparents Maria and Battista, on my parents' deck. July 2013.

2.12.13

Halfmoons

ingredients
cookie dough
Flour, 3¾ cups
Baking powder, ¾ tsp
Baking soda, 2 tsp
Sugar, 2¼ cups
Butter, cut 1-tbsp into pieces, 16 tbsp
Cocoa powder, sifted, ¾ cup
Salt, ¼ tsp
Eggs, 2
Vanilla extract, 1 tsp
Whole milk, 1½ cups

fudge icing
Bittersweet chocolate, 3½ oz
Semisweet chocolate, 3½ oz
Butter, 1 tbsp
Confectionary sugar, sifted, 4 1/3 cups
Corn syrup, 2 tbsp
Vanilla extract, 1 tsp
Salt, 1 pinch

vanilla buttercream icing
Confectionary sugar, 7 cups
Butter, cut 1-tbsp into pieces, 16 tbsp
Vegetable shortening, ½ cup
Whole milk, 7 tbsp
Vanilla extract, 1 tbsp
Salt,  ¼ tsp

directions
cookies
1. Preheat oven to 350°F.
2. Sift together flour, baking powder, and baking soda in a medium bowl and set aside.
3. Put sugar, butter, cocoa, and salt in bowl of standing mixer and beat on medium speed until fluffy.
4. Add eggs and vanilla and continue to beat.
5. Add half the milk, then half the flour mixture, beating after each addition until smooth; repeat with remaining milk and flour mixture.
6. Spoon batter onto parchment-lined baking sheets, making 3-inch rounds two inches apart.
7. Bake until cookies are set, about 12 minutes.
8. Allow to cool, then remove from parchment.

fudge icing
1. Melt bittersweet and semisweet chocolates and butter in the top of a double boiler over simmering water over medium heat.
2. Add confectioners’ sugar, corn syrup, vanilla, salt, and 6 tablespoons of boiling water.
3. Mix to a smooth, stiff paste with a rubber spatula.
4. Thin icing with up to 8 tablespoons of boiling water. Icing should fall from a spoon in thick ribbons.
5. Keep icing warm in a double boiler over low heat.

white buttercream icing
1. Put sugar, butter, shortening, milk, vanilla, and salt in the bowl of a standing mixer.
2. Beat on low speed to mix, then increase to medium and beat until light and fluffy.

finally...
1. Using a metal spatula, spread about a tablespoon of warm fudge icing on half of the flat side of each cookie.
2. Spread the other half of each cookie with a heaping tablespoon of white buttercream icing.

the story
Halfmoons (they are not not NOT black and white cookies! completely different!) from Hemstrought's Bakery in Utica, New York were a staple of my childhood. Though sometimes called cookies, the base is a chewy chocolate cake with the BEST icing combination ever - rich chocolate fudge and fluffy vanilla buttercream. As a childhood, I always ate the white side first, saving my favorite - the chocolate - for last. Now I nibble the chocolate, then the white, saving a ribbon of both down the middle - because getting both in one bite really is the best.

Hemstrought's started baking halfmoons in the 1920s. When I was growing up, they were after-school treats that never stopped being special. Pizza-size "halfmoon cakes" were popular for birthday, and although they probably weren't as great as the original halfmoons, my parents managed to ship one all the way to Virginia for my seventeenth birthday, my first away at college. The pizza we ordered got lost on its way to our dorm, but the halfmoon cake arrived safely.

My favorite memory of elementary school Career Day was when one of the Hemstrought's pastry chefs came and taught us how to make halfmoons, even letting us frost our own (mine might have ended up about two-thirds chocolate, one-third vanilla...). Of course, I also remember the time a caterer for one of my parents' parties included the not-exactly-elegant halfmoons on the dessert table...my mother never let them handle dessert on their own again.

Another staple of an upstate New York childhood:
My sister (always the one in pink) and I (always the one in purple) playing before school on one of the less snowy days
c. winter 1986